Forum Replies Created
-
AuthorPosts
-
Where did you get that code example? It looks like a combination of some older code I used to use plus some newer stuff, but there are several mismatches and missing things so it won’t work properly as written. To transmit on an Xbee module, you should use Serial1. Serial0 is the port you should use for printing to the serial monitor. Your example above has all the status stuff happening on Serial1, so that should be changed to just Serial and then you can transmit the Xbee string payload on Serial1, since that’s the default configuration of the solder jumpers on the back of the Mayfly.
Once you have taken whatever sensor measurement you want, you can build a data record string append to the date/time/battery/boardtemp string and then write it to the memory card, and then also use those same variables to build the URL string in a separate function. Then just send that URL string to the Xbee serial port (assuming you’ve turned on the Bee module in advance, I use the pin-sleep configuration so I’m able to toggle the Beee module on and off).
Also, in your code above, the onboard battery voltage measurement part in the createDataRecord has the ratio as 1.47, which is only correct for Mayfly boards v0.3 and 0.4. For boards v0.5 and above, the ratio is 4.7. Which version of Mayfly do you have?
The code I posted above is for the Arduino/Xbee receiver module. All it does is “visit” a URL that it “hears” on the radio. The Mayfly logger in the field is the unit that actually generates the rest of the URL. I put the beginning of the URL in the receiver code above just for simplicity, but in real life the entire URL is generated on the field loggers because sometimes they visit different PHP scrips or domains. If you have more than one logger sending data, you’re going to want to have different tables for each station. Then you have the parameters to send. So the logger payload that goes into “thisData” in the example would be a string that should look something like this: UnitId=001&Temperature=14.2&Voltage=2.5&Depth=342.5
And the full URL would be: https://www.somewebsite.com/demo.php?UnitId=001&Temperature=14.2&Voltage=2.5&Depth=342.5
Your PHP script would then put the 3 parameters into the table name designated by “UnitId”.
There’s a lot of things that could cause your data to now show up in the table, either on the Arduino end or the server/PHP end. Have you tried visiting the URL using your web browser to make sure you’re able to post data to the table using a properly formatted URL? If you can do it with a browser, then you know your PHP code is right and the issue is with your Arduino sketch. But if you can’t add data to the table via your browser, then you’ll need to fix your PHP code on the server.
As mentioned above, I use lots (100+) of GPRSbee modules, they are available from SODAQ in the Netherlands. They are 2G, so they only work in certain areas, but we find there’s coverage in about 90% of our locations. There are 3G and 4G bee modules available from other companies like Digi, but they cost at least twice as much so we usually just use the GPRSbees.
As for the switched 5-volt supply on the Mayfly, it’s a boost converter that I put on the Mayfly years ago because we use a lot of sensors that require 5-volt excitation, but then they return a 0-2.5v analog signal, which is safe for the Mayfly to read with either the onboad 10-bit ADC, or the auxiliary 16-bit ADC. The 5v boost isn’t needed for working with the Grove rangefinder I linked above. I have successfully used them with the Mayfly before, and they are fine being powered by the 3.3v supply of the Mayfly, which is preferred since the signal levels between the Mayfly and any peripheral sensor should be the same. If you power an external device with 5v, then you should use additional level-shifting circuitry to protect the Mayfly from potential damage.
The VCC pin of the Grove ports on the Mayfly are powered by the SW_3v3 line by default. Swapping the jumper headers next to the jacks will change them to 5v, but only do that if you are prepared to deal with the potential voltage mismatch. To control the SW_5 and SW_3v3 pins of the Mayfly, simply write pin D22 high whenever you want to power anything connected to the Grove terminals.
Grove connectors, cables, and sensors are actually quite easy to get. Usually when you buy a Grove sensor, it comes with a free 20-cm cable. Or you can get 5-packs of the cables for around $3. https://www.robotshop.com/en/grove-4-pin-buckled-20cm-cable.html
You can get 10 Grove connectors for $1: https://www.robotshop.com/en/seeedstudio-grove-4-pin-connector.html
Here’s a Grove version of HC-SR04 ultrasonic sensor: https://solarbotics.com/product/29062/
Also available here: https://www.epictinker.com/Grove-Ultrasonic-Ranger-p/sen10737p.htm
And from Jameco: https://www.jameco.com/z/101020010-Seeed-Studios-Grove-Ultrasonic-Ranger-Distance-Sensor_2237845.htmlSolarbotics.com and Epictinker.com both have a bunch of Grove sensors and cables.
RobotShop has over 100 Grove-related products: https://www.robotshop.com/en/catalogsearch/result/?q=grove&order=relevance&dir=desc
Robotmesh has even more: https://www.robotmesh.com/catalogsearch/result/?cat=0&q=grove
Mouser sells a variety of Grove/Seeed products: https://www.mouser.com/new/seeedstudio/seeed-studio-grove-sensor/
So does Digikey.On most of our Mayfly sensor stations, We use the 3.5W panel from Voltaic, and it’ll charge a brand new battery just a few hours in full sun. When you buy a new Lipo, it should already be at least 50% charged, so you won’t be starting from zero. And you should avoid totally discharge a battery because that will damage it and shorten it’s lifespan or kill it entirely. So there should never be a time where you need to charge a fully-depleted Lipo. If this happens often then you need to change your circuit or increase your battery capacity. Our datalogger stations use sleeping routines, sensor switching, and other smart power management tricks to allow them to run for weeks even without sunlight, so on a normal day they need about a half hour of sun to charge the battery after being in the dark overnight.
The charge regulator on the Mayfly circuit board has a maximum output of 500mA, so even if you put a large 6-watt panel on the Mayfly, it’s still not going to charge it any faster since you’re limited by the 500mA charge regulator. But in areas with lots of shade, using a large shaded 6-watt panel can give you the same results as using a smaller panel in full sun.
The yellow LED on the Mayfly indicates that the battery is actively being charged. Once the battery is fully charged, that LED goes out and there’s no other indication that the battery is full. The Mayfly can sample the input Lipo battery voltage on analog input A6 so you can print it to the serial monitor or write it to the card or whatever. There’s an example sketch on how to do that here: https://envirodiy.org/mayfly/software/battery-measurement/ If you’re needing to know Lipo battery voltages often and when not connected to a Mayfly, then there are small Lipo voltmeters you can get, just be sure to observe polarity since many of them have reversed pins on the JST-2.0 jacks.
And yes, the Mayfly will charge your battery even if the power switch is turned off. You can also charge a Lipo battery by connecting the microUSB cable of the Mayfly to your computer or just use a regular phone charger.
Here’s the code running on the UnoEthernet/Xbee shown above, but with the URL and IP addresses removed. I based this all from some examples I found about 6 years ago, so there’s probably better ways to do this nowadays.
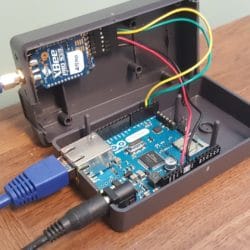
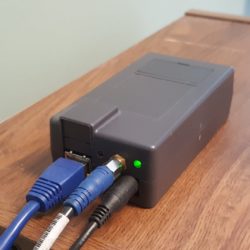
Arduino123456789101112131415161718192021222324252627282930313233343536373839404142434445464748495051525354555657585960616263646566676869707172737475767778798081828384858687888990919293949596979899100101102103104105/*Feb 18, 2013With Xbee radio attached to pins 2 and 3, and ethernet shield connected to Arduino (or use Uno Ethernet),this sketch takes any captured string and sends it to a URL of a server running a php scriptthat captures the data and writes it to a mySQL database*/#include <SPI.h>#include <Ethernet.h>#include <SoftwareSerial.h>SoftwareSerial xbeeSerial(2, 3); // RX, TXString readString = ""; //temporary string to store the incoming xbee databoolean stringComplete = false; // whether the string is completebyte mac[] = { 0x22, 0x22, 0x55, 0x55, 0x99, 0x99 }; // put the unique MAC address of your Uno ethernet board hereIPAddress server(192, 555, 999, 999); // IP address of the name server for where your php script residesEthernetClient client;void setup() {// start serial port:Serial.begin(57600);xbeeSerial.begin(2400); //The Xbee 900mhz module has trouble capturing faster than 2400baud with the UnoEthernet//so be sure to program the Xbee module's baud rate beforehand using XCTUSerial.println("sends entire captured string (with full url) to whatever URL is captured");Serial.println("Also resests the ethernet connection if it gets disconnected at some point");// start the Ethernet connection:if (Ethernet.begin(mac) == 0) {Serial.println("Failed to configure Ethernet using DHCP");// DHCP failed, so use a fixed IP address:}}void loop() // run over and over{//delay(100);if (stringComplete) {Serial.print("CapturedString: ");Serial.print(readString);//delay(1000);sendData(readString); //goes to URL and posts the data// clear the string:Serial.println("Clearing string...");readString = "";stringComplete = false;}if (xbeeSerial.available() >0) {char c = xbeeSerial.read(); //gets one byte from serial buffer//if((c>='0' and c<='9') || c==' ')//{//Serial.print(c);readString += c; //makes the string readString//}if (c == '\n') {stringComplete = true; }//Serial.write(xbeeSerial.read()); prints each character if you really want to see each one as it comes in}}void sendData(String thisData) {// if there's a successful connection:Serial.println("connecting to server...");if (client.connect(server, 80)) {Serial.println("connected");// Make a HTTP request:client.print("GET http://www.somewebsite.com/demo.php?"); //place your complete URL address hereclient.println(thisData);client.println(" HTTP/1.0");client.println("Host: http://www.somewebsite.com");client.println();client.stop();Serial.println("Data sent to the website");delay(100);}else {Serial.println("internet connection failed");delay(1000);//reset the Arduino module to hopefully fix the dropped internet connectionclient.stop();delay(1000);Ethernet.begin(mac);delay(1000);}} //end sendDataHere’s a couple photos of the UnoEthernet/Xbee receiver I built a long time ago. I has been running non-stop since February 2013 and receives about 4500 transmissions per day. With an average of 10 parameters per transmission, that’s 16.5 million parameters per year, so this little box has passed over 80 million parameters into my simple database in the past 5 years. I haven’t had to restart it do anything in the past 5 years except once when I had to update the IP address of the destination website nameserver when the host did some updates that resulted in a new address.
The Xbee module is a XbeePro 900Mhz and is mounted to an Xbee adapter board from Adafruit. I drilled holes in the case and bent the LEDs so that they poke through the case you can see the Xbee’s status. It’s held on to the case by the SMA jack of the XbeePro. It’s connected to a coax line that runs to the roof where we mounted a high-gain omnidirectional antenna.
This is what we use for receiving data from all of the stations within about a mile of our research lab. The rest of our dataloggers in other locations send data to the database via cellular modules with a $5/month cell plan from Hologram.io
We have more than 100 loggers streaming live data every 5 minutes, that adds up to around 9 million points per month and over 100 million points per year.
Attachments:
The Mayfly has an ADS1115 16-bit A/D converter on it. To use it, you can use the Adafruit ADS1x15 library and follow the tutorial on this page: https://learn.adafruit.com/adafruit-4-channel-adc-breakouts?view=all
The library comes with examples for single-ended and differential measurements. So you can follow the differential example to take a reading with the Mayfly. The ADS1115 on the Mayfly is at the default I2C address of 0x48. Using the default gain of 2/3, you’ll have a resolution of 0.1875mV per bit. So if you want 0.1mV resolution, you need to switch the gain to 2 so you’ll get 0.0625mV per bit. But that also limits the range of the maximum input voltage, so be careful not to exceed it. Exact details about the resolution and gain settings can be found in the example sketch that comes with the library.
-
AuthorPosts

 Welcome to EnviroDIY, a community for do-it-yourself environmental science and monitoring. EnviroDIY is part of
