Forum Replies Created
-
AuthorPosts
-
That’s the folder for the library itself. You want to create your own separate folder for your logger deployment and its code. Follow the steps from the tutorial, episode 9, in the section “Managing your sketches in your own deployments repo.” In that, you’re copying the folder for a single example (simple_logging) into your own deployment project. Within that folder is the platformio.ini needed for that example.
That automatic library population used to happen in PIO version 3ish, but it got lost somewhere in the updates. It’s good to hear it’s back again.
I don’t usually specify the version of ModularSensors in my ini file, but it’s not a bad idea to do so. If you want to later recreate the set-up exactly, then it’s definitely easier if the version number is in the set-up. Most of the time for us, though, when something goes wrong in the field, we reprogram it with the newest version of the library rather than reprogram with the version it had had previously.
My intent was to help you by giving you an example of something you could modify to your needs, not to give you a final working program.
This version will compile. I don’t know if it will actually work for your sensors or log data as expected. You will need to test that.
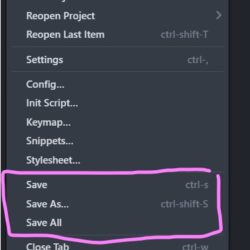
C++123456789101112131415161718192021222324252627282930313233343536373839404142434445464748495051525354555657585960616263646566676869707172737475767778798081828384858687888990919293949596979899100101102103104105106107108109110111112113114115116117118119120121122123124125126127128129130131132133134135136137138139140141142143144145146147148149150151152153154155156157158159160161162163164165166167168169#include <SDI12.h>#include <SD.h>#include <Wire.h>#include <DS3232RTC.h>#include <Adafruit_MLX90614.h>#define DATA_PIN 3SDI12 mySDI12(DATA_PIN);const int chipSelect = 10;unsigned long time;File logFile;Adafruit_MLX90614 sensor_52 = Adafruit_MLX90614(0x52);Adafruit_MLX90614 sensor_53 = Adafruit_MLX90614(0x53);Adafruit_MLX90614 sensor_03 = Adafruit_MLX90614(0x03);Adafruit_MLX90614 sensor_07 = Adafruit_MLX90614(0x07);// keeps track of the wait time for each active addressesuint8_t waitTime[8] = {0,};// keeps track of the time each sensor was starteduint32_t millisStarted[8] = {0,};// keeps track of the time each sensor will be readyuint32_t millisReady[8] = {0,};// How many sensors to readuint8_t numSensors = 8;// converts allowable address characters '0'-'9', 'a'-'z', 'A'-'Z',// to a decimal number between 0 and 61 (inclusive) to cover the 62 possible addressesbyte charToDec(char i){if((i >= '0') && (i <= '9')) return i - '0';if((i >= 'a') && (i <= 'z')) return i - 'a' + 10;if((i >= 'A') && (i <= 'Z')) return i - 'A' + 37;else return i;}void startConcurrentMeasurement(char i){String command = "";command += i;command += "C!"; // SDI-12 concurrent measurement command format [address]['C'][!]mySDI12.sendCommand(command);delay(30);// wait for acknowlegement with format [address][ttt (3 char, seconds)][number of measurments available, 0-9]String sdiResponse = "";delay(30);while (mySDI12.available()) // build response string{char c = mySDI12.read();if ((c != '\n') && (c != '\r')){sdiResponse += c;delay(5);}}mySDI12.clearBuffer();// find out how long we have to wait (in seconds).uint8_t wait = 0;wait = sdiResponse.substring(1, 4).toInt();uint8_t sensorNum = charToDec(i); // e.g. convert '0' to 0, 'a' to 10, 'Z' to 61.waitTime[sensorNum] = wait;millisStarted[sensorNum] = millis();millisReady[sensorNum] = millis() + wait * 1000;}void logSDI12Results(char i){String command = "";// in this example we will only take the 'DO' measurementcommand = "";command += i;command += "D0!"; // SDI-12 command to get data [address][D][dataOption][!]mySDI12.sendCommand(command);// wait for acknowlegementuint32_t startMillis = millis();while (!(mySDI12.available() > 7) && (millis() - startMillis < 5000L)){}mySDI12.read(); // throw away the repeated addresslogFile.print(mySDI12.readStringUntil('+')); // read and log red bandlogFile.print(";");logFile.print(mySDI12.readStringUntil('+')); // read and log nir bandlogFile.print(";");logFile.print(mySDI12.readStringUntil('\n')); // read and log orientationlogFile.print(";");mySDI12.clearBuffer();}void setup(){Serial.begin(115200);sensor_52.begin();sensor_53.begin();sensor_03.begin();sensor_07.begin();Wire.begin();if (!SD.begin(chipSelect)){return;}while (!Serial);mySDI12.begin();delay(500);logFile = SD.open("hwheat.txt", FILE_WRITE);if (logFile){logFile.println("fecha;hora;r_red;r_nir;r_orientation;r_red;r_nir;r_orientation;r_red;r_nir;r_orientation;r_532;r_570;orientation;r_532;r_570;orientation;r_532;r_570;orientation;i_532;i_570;orientation;r_red;r_nir;r_orientation;Temp1;Temp2;Temp3;Temp4");logFile.close();}}void lectura_sensores(){logFile.print(sensor_52.readObjectTempC());logFile.print(";");logFile.print(sensor_53.readObjectTempC());logFile.print(";");logFile.print(sensor_03.readObjectTempC());logFile.print(";");logFile.println(sensor_07.readObjectTempC());}void loop(){time_t p;p = RTC.get();logFile = SD.open("hwheat.txt", FILE_WRITE);if (logFile){logFile.print(String(day(p)) + "/" + String(month(p)) + "/" + String(year(p)) + ";" + String(hour(p)) + ":" + String(minute(p)) + ":" + String(second(p)));// Start a concurrent measurement on all of the SDI-12 sensorsfor (char i = '0'; i < '8'; i++){startConcurrentMeasurement(i);}// get all readingsuint8_t numReadingsRecorded = 0;while (numReadingsRecorded < numSensors){for (char i = '0'; i < '8'; i++){if (millis() > millisReady[charToDec(i)]){logSDI12Results(i);numReadingsRecorded++;}}}logFile.print(";");lectura_sensores();logFile.close();}}Ctrl+S will save the file. That keyboard shortcut works on almost all Windows programs, including VS Code, Atom, MS Word, Excel, etc.
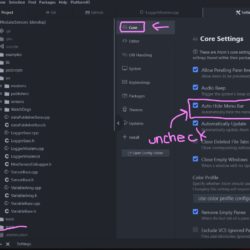
You can make the normal “file” menu visible in Atom in the settings. I’ve attached a screenshot. PlatformIO is just a command line tool and an extension for an editor. The editing program is either VS Code or Atom and basic functions like saving are part of the editor and not of PlatformIO. Have you decided to stick with Atom? I’m only asking so I can give you screenshots of the right editor.
Attachments:
Could it be DropBox syncing? If you have that folder set to automatically synchronize with anything, make sure you exclude the entire .pio folder and all of its subfolders from your synchronization. PlatformIO expects to have full control of that folder and will be very, very unhappy if other processes try to lock onto those files. Every time you build/compile your program there are a bunch of new files created and others modified or deleted in sub-directories of that .pio file. Those files are not useful to archive, but are needed to successfully convert your code from what you see into assembly that your board can use.
You have git installed, right? I don’t think you’d even get this far without it. I think either VSCode or Atom (both) include it.
Otherwise, try running the same install command a few times. As long as it gets a little farther each time, it’s fine. I think this crashing happens when the background processes for the linter and compiler are trying to read your libraries while you’re installing them in the foreground.
Did you try just running the same command a second time like I’d suggested? Did it install any libraries?
The platformio.ini file is just a text file. If you can open it and view it, it’s not corrupted.
The commands I gave you should accomplish getting the libraries installed. Sometimes when installing a lot of libraries the installer gets ahead of itself and trips and crashes. Most of the time, running the command a second time will be successful. Make sure that all installs are completely finished before you attempt to build anything.
Since you’ve mentioned moving things around in the lib and other folders from what you downloaded, I don’t think it would be a bad idea to delete it and start again if the library install doesn’t fix your issues.
Here’s your program that compiled correctly for me.
Attachments:
Well, it really is that “easy.” “All” you do have to do is create a new project/program, make sure it’s completely blank, copy and paste the example from GitHub into your new project, select precisely each UUID and delete the example junk text, select and copy the real UUID from the MonitorMW webpage and paste it in exactly the place you removed the example from, repeat that 7+ times, install all the libraries correctly, and compile and flash your Mayfly. That’s it.
It just that it’s actually kind-of tricky to make sure you’ve selected exactly the right text when you’re doing all the copy-pasting and if you didn’t remember to start with something blank at the beginning things get mixed up and then you have to start deleting and fixing and then you end up in this mess.
Looking back at the old threads.. I told you to delete the loop because you had other junk after the end of the loop and I went back too many line. Doh. Totally my fault.
After adding the opening brace I mentioned in line 239 and adding the loop at the very end, after everything else, your program compiles fine for me. Did you by chance accidentally add both an opening and closing brace instead of just the opening one? The editor helpfully adds the closing brace for you when you type the opening one.
Let us know how the Verizon SIMs work for you!
-
AuthorPosts

 Welcome to EnviroDIY, a community for do-it-yourself environmental science and monitoring. EnviroDIY is part of
