Forum Replies Created
-
AuthorPosts
-
If you’re having trouble, you can try going into bypass and checking the operator profile directly on the u-blox: send
AT+UMNOPROF?It should reply 3 (matching up with the CP value). If for some weird reason it doesn’t, you can change it by first disconnecting from the network, changing the profile, and then restarting:AT+CFUN=0(OK)AT+UMNOPROF=3(OK)AT+CFUN=1,1(OK, then a delay and possibly a junk character or two on restart). The setting should hold when you go back into Transparent (and the Digi software will register the change).Shannon and I were just talking about this – the Hologram SIM’s just really prefer AT&T. Verizon gets written the the FPLMN list really fast. It appears there as 311480.
Also, I’m shamefully bad about notifying anyone when I’ve updated the libraries.
No worries! I should have checked everything out on the Arduino IDE anyway.
If you have the same library installed in a global folder (ie user\me_xx\.platformio\lib\xxx) and the local project library dependency folder (project_xx\.pio\libdeps\xxx) PlatformIO should select the local one to build that project and ignore the global installation. Here’s the docs on the prioritization of installed libraries used at compile time: https://docs.platformio.org/en/latest/librarymanager/ldf.html#dependency-finder-mode
Personally, I don’t install any libraries at all to my “global” folder in platformio. (ie user\me_xx\.platformio\lib\xxx) I always reclone the entire batch of libraries into the .pio\libdeps\xxx folder for each project. That way I can recreate a specific program with the libraries just as they were when the program was used and can update at will for any given project. It means re-downloading the files a bunch of times and wasting space on your computer with those files, but they’re fairly small text files.
Do you have a carrier board that you can use to connect the XBee3 to the computer? If so, then the easiest way is to use that.
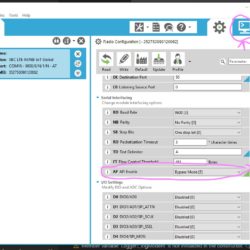
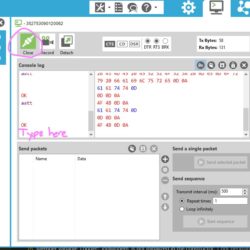
Open XCTU and find the XBee3. To type direct AT commands to the u-blox you need to be in bypass – get there by scroll down in XCTU to the “Serial Interfacing” section and change API Enable to “Bypass Mode [5].” Click the pencil to write. XCTU is smart enough to reset the Bee when you change the mode. After changing that, open the terminal tab in XCTU (icon in the top right that looks like a screen with a command prompt on it). Hit the “open” icon. Then in the console log section you can type away. If you don’t get an ok back after hitting enter, verify that you’re in bypass mode. Try just “AT” several times to make sure you’re talking. There’s no Digi commands for the forbidden list, so bypass is the only way to do it.
The StreamDebugger can work, but it’s finickey. Usually if there’s some reason I want to talk to the XBee directly and I don’t have the carrier board with me, I write the a simple program that wakes the Bee and then sends
Serial1.print("AT blah..");and prints backSerial.print(Serial1.readString());for everything I want to say and run that on the Mayfly. Doing it that way usually works better for me.If you want to use the Digi AT commands to talk to your Bee, you definitely want to change the “Guard Time” setting either with XCTU or using the Mayfly to send it “ATGT6D3” to increase that guard time back up to the default of 1 second. To enter command mode you wait the guard time, type in three +++’s (NO ENTER!) and wait the guard time again and should get an OK. Default is 1s wait on each side. When TinyGSM talks to the bee, the first thing it does is cut that down to 100ms. I can’t ever manage to type the +’s in fast enough to get into command mode unless I bump the time up again. Once you’re in command mode you have 10s from the last successful command before it will automatically fall out of command mode and you’ll need to use the +’s again. The “ATCN” will also immediately exit command mode.
I got it to compile on the Arduino IDE, so there’s must be a tangle in your library structure. Can you open the library folder (probably in my documents/arduino if you’re using windows) and look at your folders and make sure you only have one TinyGSM? Can you open the TinyGSM folder and open “TinyGsmCommon.h” and check the version number?
Oh dear. I forgot to test on the Arduino IDE. I’ll start looking into it.
The Hologram dashboard should say “Verizon” in some way if it connected to that network. The Hologram SIMs do work on Verizon, but they nearly always connect to AT&T in my experience. There was a thread just a bit ago about setting the carrier profiles for the LTE-M XBee3’s , and for the time being we’ve decided that the default of “0/Automatic” isn’t stable on Hologram and we will specifically select AT&T unless it’s known to not be present at the site.
Changing the setting in profile to 3/Verizon should work, but I’ve found you might need to set it and reset or power cycle a few times before the setting “takes.” You may also need to clear your “forbidden” list: https://support.hologram.io/hc/en-us/articles/360035697373-How-do-I-clear-the-FPLMN-list-. From recent conversations with Hologram tech support they say the u-blox SARA R410M is pretty quick to decide that it’s failed to connected to a network/operator and should mark that network as forbidden.
Re-Wrote for you. I didn’t even test if it compiles, but this should get you going with concurrent measurements:
123456789101112131415161718192021222324252627282930313233343536373839404142434445464748495051525354555657585960616263646566676869707172737475767778798081828384858687888990919293949596979899100101102103104105106107108109110111112113114115116117118119120121122123124125126127128129130131132133134135136137138139140141142143144145146147148149150151152153154155156157158159160161162163164165166167168169170/*The Sensor Orientation Index. This number is two when the sensor is upward facing, one when the sensor is downward facing, and zerowhen orientation is undetermined.*/#include <SDI12.h>#include <SD.h>#include <Wire.h>#include <DS3232RTC.h>#include <Adafruit_MLX90614.h>#define DATA_PIN 3SDI12 mySDI12(DATA_PIN);const int chipSelect = 10;unsigned long time;File logFile;Adafruit_MLX90614 sensor_52 = Adafruit_MLX90614(0x52);Adafruit_MLX90614 sensor_53 = Adafruit_MLX90614(0x53);Adafruit_MLX90614 sensor_03 = Adafruit_MLX90614(0x03);Adafruit_MLX90614 sensor_07 = Adafruit_MLX90614(0x07);// keeps track of the wait time for each active addressesuint8_t waitTime[8] = {0,};// keeps track of the time each sensor was starteduint32_t millisStarted[8] = {0,};// keeps track of the time each sensor will be readyuint32_t millisReady[8] = {0,};// How many sensors to readuint8_t numSensors = 8;void startConcurrentMeasurement(char i){String command = "";command += i;command += "C!"; // SDI-12 concurrent measurement command format [address]['C'][!]mySDI12.sendCommand(command);delay(30);// wait for acknowlegement with format [address][ttt (3 char, seconds)][number of measurments available, 0-9]String sdiResponse = "";delay(30);while (mySDI12.available()) // build response string{char c = mySDI12.read();if ((c != '\n') && (c != '\r')){sdiResponse += c;delay(5);}}mySDI12.clearBuffer();// find out how long we have to wait (in seconds).uint8_t wait = 0;wait = sdiResponse.substring(1, 4).toInt();uint8_t sensorNum = charToDec(i); // e.g. convert '0' to 0, 'a' to 10, 'Z' to 61.waitTime[sensorNum] = wait;millisStarted[sensorNum] = millis();millisReady[sensorNum] = millis() + wait * 1000;}void logSDI12Results(char i){String command = "";// in this example we will only take the 'DO' measurementcommand = "";command += i;command += "D0!"; // SDI-12 command to get data [address][D][dataOption][!]mySDI12.sendCommand(command);// wait for acknowlegementuint32_t startMillis = millis();while (!(mySDI12.available() > 7) && (millis() - startMillis < 5000L)){}mySDI12.read(); // throw away the repeated addresslogfile.print(mySDI12.readStringUntil('+')); // read and log red bandlogFile.print(";");logfile.print(mySDI12.readStringUntil('+')); // read and log nir bandlogFile.print(";");logfile.print(mySDI12.readStringUntil('\n')); // read and log orientationlogFile.print(";");printBufferToScreen();mySDI12.clearBuffer();}void setup(){Serial.begin(115200);sensor_52.begin();sensor_53.begin();sensor_03.begin();sensor_07.begin();Wire.begin();if (!SD.begin(chipSelect)){return;}while (!Serial);mySDI12.begin();delay(500);for (byte i = '0'; i <= '9'; i++)if (checkActive(i)){numSensors++;setTaken(i);}logFile = SD.open("hwheat.txt", FILE_WRITE);if (logFile){logFile.println("fecha;hora;r_red;r_nir;r_orientation;r_red;r_nir;r_orientation;r_red;r_nir;r_orientation;r_532;r_570;orientation;r_532;r_570;orientation;r_532;r_570;orientation;i_532;i_570;orientation;r_red;r_nir;r_orientation;Temp1;Temp2;Temp3;Temp4");logFile.close();}}void lectura_sensores(){logFile.print(sensor_52.readObjectTempC());logFile.print(";");logFile.print(sensor_53.readObjectTempC());logFile.print(";");logFile.print(sensor_03.readObjectTempC());logFile.print(";");logFile.println(sensor_07.readObjectTempC());}void loop(){time_t p;p = RTC.get();logFile = SD.open("hwheat.txt", FILE_WRITE);if (logFile){logFile.print(String(day(p)) + "/" + String(month(p)) + "/" + String(year(p)) + ";" + String(hour(p)) + ":" + String(minute(p)) + ":" + String(second(p)));// Start a concurrent measurement on all of the SDI-12 sensorsfor (char i = '0'; i < '8'; i++){startConcurrentMeasurement(i);}// get all readingsuint8_t numReadingsRecorded = 0;while (numReadingsRecorded < numSensors){for (char i = '0'; i < '8'; i++){if (millis() > millisReady[charToDec(i)]){logSDI12Results(i);numReadingsRecorded++;}}}logFile.print(";");lectura_sensores();logFile.close();}} -
AuthorPosts

 Welcome to EnviroDIY, a community for do-it-yourself environmental science and monitoring. EnviroDIY is part of
