Home › Forums › Mayfly Data Logger › PlatormIO: ..Python 2.7 interpreter error
- This topic has 30 replies, 3 voices, and was last updated 2020-04-08 at 11:35 PM by
 Jim Moore.
-
AuthorPosts
-
-
2020-03-13 at 1:55 PM #13919
I have installed Atom on my Windows 10 PC following the instructions in “Learn EnviroDIY Programming”
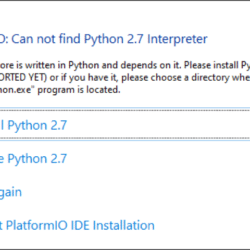
When I launch atom I get the attached error message. I have downloaded Python2.7 and if I point to that with the “I have Python 2.7” option Atom it can’t find it. At this point Atom is hung and I have force quit.
If I launch Python.exe I get a command line interface. Are there some magic incantations I can issue to allow Atom to find it?
I get confusing answers from Dr Google
Help!
Attachments:
-
2020-03-14 at 12:19 AM #13924
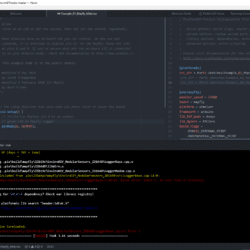
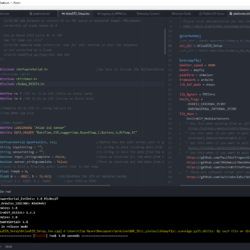
I have platformIO working with atom and get a compile error with the blink example. I checked https://github.com/EnviroDIY/ModularSensors/issues/247 opened a terminal but get a bash script error with “pio lib update”
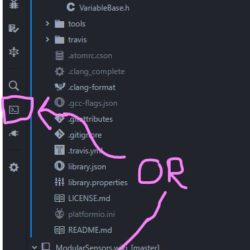
How to I get to the terminal in atom?
attached a screen shot
Attachments:
-
2020-03-14 at 10:41 AM #13926
I figured out how to get terminal which is the sketch output window. Took a while to realize that the .ini file overides the terminal settings and was at the wrong baud rate to test output from my set RTC sketch.
I copied a SODAQ…h file to “lib” when the compiler was looking for that.
Next step is
pio lib uninstall xxxbut not sure what xxx is. Is it the “lib” folder in my current project?If so, should I just delete it and rerun pio lib update ?
Thanks
-
2020-03-16 at 11:20 AM #13928
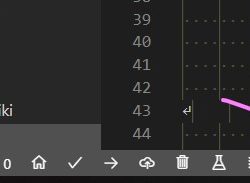
pio lib uninstall xxxwould mean “uninstall the library named xxx”. You’d replace the “xxx” with the name of whatever library you’re trying to uninstall. All of the documentation and examples use “xxx” meaning “replace this part with your own text”.I put up screen shots with the locations of buttons to open a new terminal.
Attachments:
-
2020-03-16 at 11:42 AM #13931
Copying only an h file into your directory is *not* the proper way to install a library. You should list the library in the “lib_deps” section of your platformio.ini and run the command
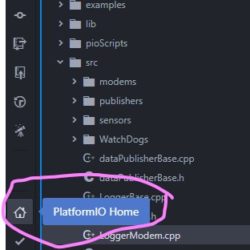
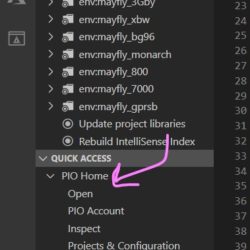
pio lib installwhich should install the libraries listed in that section and their dependencies or you can install a single library with the commandpio lib install xxxreplacing xxx with either the name of the library or the location of a git repository.The most recent version of PlatformIO also has a point-and-click style (gui) library manager available through the platformio home menu. See this for more information on that: https://docs.platformio.org/en/latest/librarymanager/
I added screen shots of how you get to the home in Atom and VSCode.
Attachments:
-
2020-03-16 at 12:08 PM #13934
As a beginner, I would suggest you pick either Atom OR VS Code – whichever one feels most intuitive to you – and use that one exclusively rather than attempting to flip back and forth between them. Both editors will give you exactly the same tools for PlatformIO, but the menus and drop-downs and styling are different. Rather than try to to remember how each is different, just pick one.
-
2020-03-16 at 11:47 PM #13937
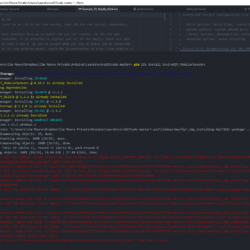
I ran the “pio lib install” command and got the following:
Try to find answer in FAQ Troubleshooting section
https://docs.platformio.org/page/faq.html
* Report this problem to the developers
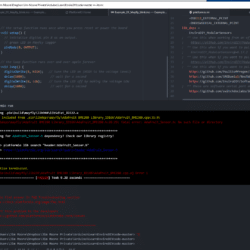
https://github.com/platformio/platformio-core/issuesCompile fails: “looking for Adafruit_sensor.h” and a couple of days ago compile was failing looking for “SODAQ…h” file.
I attached a screen shot of where I am stuck. Suggestions?
-
2020-03-16 at 11:51 PM #13939
screen shot
Attachments:
-
2020-03-17 at 11:06 AM #13944
You didn’t post the screenshot of the
pio lib installso I’m not sure what’s happening there.Try installing the libraries one after the other using these commands:
pio lib install EnviroDIY_ModularSensorspio lib install https://github.com/PaulStroffregen/AltSoftSerial.gitpio lib install https://github.com/SRGDamia1/NeoSWSerial.gitpio lib install https://github.com/EnviroDIY/SoftwareSerial_ExternalInts.gitpio lib install https://github.com/switchdoclabs/SDL_Arduino_SSD1306.gitI’m not sure if you need all of them, but it shouldn’t hurt to have them installed.
-
2020-03-17 at 11:53 AM #13946
Ok, I will try this. If that doesn’t work shall I delete “LearnEnviroDIYcode-master” that I downloaded in case the platform.ini file is corrupted? Or should the above steps accomplish the same thing?
Each time I attempt to compile I get “looking for xxx.h dependency? Check your Library registry!” The missing .h file is different each time I attempt to compile.
I’ll rerun the pio lib install command and send a screen shot. I am getting errors when I do this.
stay tuned and be sure to wash your hands!
-
2020-03-17 at 4:03 PM #13955
The platformio.ini file is just a text file. If you can open it and view it, it’s not corrupted.
The commands I gave you should accomplish getting the libraries installed. Sometimes when installing a lot of libraries the installer gets ahead of itself and trips and crashes. Most of the time, running the command a second time will be successful. Make sure that all installs are completely finished before you attempt to build anything.
Since you’ve mentioned moving things around in the lib and other folders from what you downloaded, I don’t think it would be a bad idea to delete it and start again if the library install doesn’t fix your issues.
-
2020-03-17 at 10:00 PM #13956
I reloaded my learnEnviroDIYcode-master to my /arduino directory
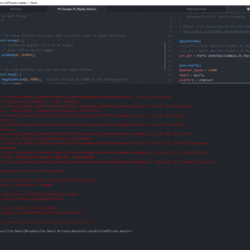
Here is a screen shot of errors I got when I ran
pio lib install EnviroDIY_ModularSensorsAttachments:
-
2020-03-17 at 10:35 PM #13958
Did you try just running the same command a second time like I’d suggested? Did it install any libraries?
-
2020-03-17 at 10:37 PM #13959
I rebooted my PC and same result. Attached a screen shot of the error thread from initial command.
Here is the first error
[WinError 32] The process cannot access the file because it is being used by another process: ‘C:\\Users\\Jim Moore\\Dropbox\\Jim Moore Private\\Arduino\\LearnEnviroDIYcode-master\\.pio\\libdeps\\mayfl
y\\_tmp_installing-8a57361r-package\\.git\\objects\\56‘I have no clue what process would be using the file unless its dropBox syncing.
Attachments:
-
2020-03-17 at 10:56 PM #13961
Could it be DropBox syncing? If you have that folder set to automatically synchronize with anything, make sure you exclude the entire .pio folder and all of its subfolders from your synchronization. PlatformIO expects to have full control of that folder and will be very, very unhappy if other processes try to lock onto those files. Every time you build/compile your program there are a bunch of new files created and others modified or deleted in sub-directories of that .pio file. Those files are not useful to archive, but are needed to successfully convert your code from what you see into assembly that your board can use.
You have git installed, right? I don’t think you’d even get this far without it. I think either VSCode or Atom (both) include it.
Otherwise, try running the same install command a few times. As long as it gets a little farther each time, it’s fine. I think this crashing happens when the background processes for the linter and compiler are trying to read your libraries while you’re installing them in the foreground.
-
2020-03-18 at 11:19 PM #13962
DropBox was the problem but unsyncing that folder didn’t work. pio didnt recognize as a project file. I moved the project folder out of dropbox and build and load worked ok.
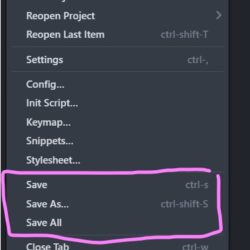
Now I am trying to find my way around pio. Can’t even find the save button!
- Open the <code class=”highlighter-rouge”>platformio.ini file in the LearnEnviroDIYcode project and type a “;” in front of the “example1” sketch, and uncomment the <code class=”highlighter-rouge”>Example_02_Mayfly_blink.ino sketch to make that active.
- Save the <code class=”highlighter-rouge”>platformio.ini file.
its bedtime!
-
2020-03-20 at 10:16 AM #13964
Ctrl+S will save the file. That keyboard shortcut works on almost all Windows programs, including VS Code, Atom, MS Word, Excel, etc.
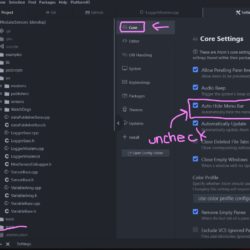
You can make the normal “file” menu visible in Atom in the settings. I’ve attached a screenshot. PlatformIO is just a command line tool and an extension for an editor. The editing program is either VS Code or Atom and basic functions like saving are part of the editor and not of PlatformIO. Have you decided to stick with Atom? I’m only asking so I can give you screenshots of the right editor.
Attachments:
-
2020-03-20 at 11:27 PM #13970
Thanks Sara-
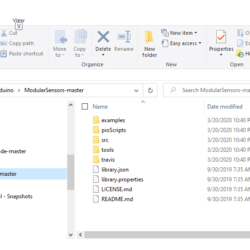
I have worked my way thru part one of LearnEnviroDIY. I am now trying to set up ModularSensors and Atom is telling me there is no platformio.ini file which there isn’t. I attached the FileExplorer view. Where did miss something. Maybe I didn’t “clone”. I downloaded the .zip file unziped and put it my directory as shown on the attached screen shot.
Attachments:
-
2020-03-23 at 10:00 AM #13973
That’s the folder for the library itself. You want to create your own separate folder for your logger deployment and its code. Follow the steps from the tutorial, episode 9, in the section “Managing your sketches in your own deployments repo.” In that, you’re copying the folder for a single example (simple_logging) into your own deployment project. Within that folder is the platformio.ini needed for that example.
-
2020-03-23 at 3:38 PM #13979
I was able to compile and load DRWI_CitSci to my mayfly without sensors and no sim card for the GPRSbee. It seemed to work as expected, wakeup, turn on power, and attempt a 2G connection and go to sleep for 5 minutes and wrote a lot of 9’s to the sd card.
Last night, however, I added a sketch to my project (GMi_ECx) and broke something and get a “file not found” error when I attempt to compile any of the sketches in that project. I will go back to and restart the process as you suggest.
I am assuming based on your comments that each sketch folder will have its own .ini and therefore any platformIO.ini file in the root directory of the project should be deleted. Does a platformIO.ini file in the root act as a default and therefor override the .ini file in the sketch directory?
I have not done anything with my GPRSbee or Hologram sim cards yet. Can you point me to any sketches that would verify that I have 2G service? I recall that Shannan had a box that she used for checking 2G signal strength.
-
2020-03-23 at 10:09 PM #13980
Following the steps in episode 9 I right clicked on the simple_loging folder in https://github.com/EnviroDIY/ModularSensors/tree/master/examples
there was no option to copy the folder on;y a link to it. How can I copy this folder and upload to my project which is local at …/documents/Arduino/GMI_ECx?
-
2020-03-23 at 11:12 PM #13981
In episode 9, copy and paste from the folder that you already saved on your computer from when you cloned the whole library not from GitHub.
You should generally create a whole new project for each logger/program – just like in the Arduino IDE. The platformio.ini file must be in the top level directory for the project – not in a sub-directory. If you really want to have multiple loggers/programs in your project, each program must be in its own sub-folder and you must use the src_dir option within the platformio section of the platformio.ini file to specify which directory you wish to build from. The structure of the ini file is well documented: https://docs.platformio.org/en/latest/projectconf/section_platformio.html#src-dir
I was under the impression you already knew there was 2G available before buying the units. I don’t think it’s worth writing up a separate program just to check signal strength unless you’re planning to make multiple trips to the site, one to check signal and another to actually deploy the Mayfly. You’ll see within the first few minutes of running your logging program if you have signal based on the blink pattern of the modem and whether data appears online. If you find out at the last minute that you don’t have signal, just yank the modem off and deploy without it. Your logger board will be powered up ~5-10s extra every logging cycle trying to communicate with a modem that’s not there, but unless you’re in a really shady spot or not using solar, it’s not worth stressing over.
-
2020-03-26 at 12:20 AM #13983
I uploaded DRWI_CitSci to my Mayfly board but I haven’t got to modifying this to work with my Atlas EZO sensors. I set up another project folder to load my Atlas setup code that I have been using for a while using Arduino IDE.
I am getting “…No such file or directory” error when I try to compile. If I point the .ini to the logging to MMW it builds succesfully.
See attached screen shot
Attachments:
-
2020-03-26 at 6:25 PM #13987
You need to include the Arduino library – add
#include <Arduino.h>to the top of your program. The Arduino IDE adds that automatically and does some other “massaging” of files when it converts an ino to a real cpp file that gcc then compiles; PlatformIO doesn’t. Depending on how you’ve structured your program, that may cause a few more snags. The two things your most likely to hit are:- pre-processor defines within a file (ie
#define) which the Arduino IDE applies as global build flags rather than single-compile-unit defines- the defines you have for pin numbers and headers are probably ok
- the basic cpp requirement that a function be declared or defined before it is used, which the Arduino IDE does some squirrlyness to get around.
- If you have any functions in your program other than
setup(){..}andloop(){...}make sure they’re above the setup and loop functions. You may also have to re-order your functions depending on the order in which you’ve created/used them.
- If you have any functions in your program other than
Like most things, PlatformIO has some documentation on this: https://docs.platformio.org/en/latest/faq.html#convert-arduino-file-to-c-manually
I don’t know what all you’re doing in your program, but I’m it might be easier to start with the ModularSensors examples and use the already existing support for Atlas sensors. And, of course, documentation for that: https://github.com/EnviroDIY/ModularSensors/wiki/Atlas-Sensors
- pre-processor defines within a file (ie
-
2020-03-27 at 10:29 PM #13992
I added #include <Arduino.h> and still won’t build. Can’t find SD.h which is in the adafruit library which I installed in my Arduino IDE I download this program to my EC sensor station to set up the EZO board to calibrate the probe, RTD, and set the update rate of the AtlasEZO. The easiest thing to do is to use the Arduino IDE when I need this sketch.
I would like to move on to get the DRWI_CitSci sketch working with my low cost EC Sensor station I have a few questions to get started:
- How do I specify the serial pins that communicate with the EZO, #define rx 7 and #define tx 6 . Will this work? i.e. are “rx” and “tx” recognized variables
- Same question for the RTD output which is on pin A0
- When I activate the Hologram SIM card and have 2G service will it plug and play?
- If that is the case and I get all the UUID’s correct I should see my data on MonMW. Right?
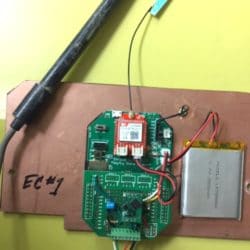
- I attached a picture of the hardware for reference.
Attachments:
-
2020-03-27 at 11:03 PM #13994
If you need the SD library in your program, you need to include it in your platformio.ini file in the lib_dep section. Add RTCTimer and Sodaq_DS3231 there while you’re at it since it looks like you use them.
Other answers:
- ModularSensors uses I2C, not Serial, for Atlas sensors. Please read the documentation I linked earlier. It has links to further Atlas documentation on how to set up I2C.
- A raw RTD like you’re using isn’t directly supported. I would recommend attaching the RTD to the auxiliary ADC (TI ADS1115 – pins AA0-AA3 on the Mayfly) which is higher resolution anyway, and then using that: https://github.com/EnviroDIY/ModularSensors/wiki/TI-ADS1115-Voltage
- To calculate temperature and to correct conductivity for temperature you should use a calculated variable in ModularSensors. I’m embarrassed that I actually don’t have documentation on that, just examples.
- There’s a very generic example of a calculated variable in the menu a la carte example: https://github.com/EnviroDIY/ModularSensors/blob/f607ff9ac5b22c87962802e5e5b348b3612d75a4/examples/menu_a_la_carte/menu_a_la_carte.ino#L1169.
- There are several calculated variables in the barometric pressure correction examples: https://github.com/EnviroDIY/ModularSensors/blob/f607ff9ac5b22c87962802e5e5b348b3612d75a4/examples/baro_rho_correction/baro_rho_correction.ino#L175
- Yes, the ModularSensors library should take care of all of the configuration for the GPRSBee
- Yes. The values should be visible immediately, the plots may take up to an hour to update.
-
2020-03-28 at 11:34 AM #13995
Thanks Sara for all the info. Glad to get a yes on my last two questions. Now I can go ahead and active my SIM cards with Hologram.
-
2020-04-01 at 2:17 PM #14005
Hi Jim: I haven’t been following this thread but I’m excited that you are pushing through this to get your data streaming to MonitorMyWatershed! I’m glad Sara has been providing help. It occurred to me that you might reach out to Adam Gold (@adamgold) because he was using both Atlas Sci hardware and PlatformIO. He published a blog detailing his project and also maintains his own website that details what he’s designed. Perhaps there are some solutions there?
Thanks Jim!
Scott
-
2020-04-02 at 11:14 AM #14009Hi Scott-I was able to get my LowCostEC sensor station uploading to MonMW using the AtlasScientific library. However what I really need is a <LowCostEC.h> library file that will address the Atlas EZO circuit in UART mode, read and calculate temperature, and apply correction coefficients. I looked at the AtlasScientificEC.h code and its way above my pay grade in terms of rewriting it to work with my sensor stations.I now have two of my stations (GMI_EC1 and GMI_EC2) running the DRWI_CitSci code with #include AtlasScientificEC.h. I reconfigured my EZO circuit to I2C so it is reporting uncompensated EC data but the sensorex temp reading is really the modem RSSI.I was pleasantly surprised to load the UUID’s into the code, activate my SIM card, and plug in the GPRSbee. Data appeared on MonMW! Couple of questions:
- I noticed several different response codes from the server – 20x(good) 40x(eror). Yet the data uploaded successfully in both cases. Are these related to signal strength or slow response of the server?
- Data seems to be uploaded with a 2G signal of -95 dBm so what is the noise floor of the GPRSbee modems?
- In attempting to solve the missing data issue I deleted GMI_EC2 and reconfigured it and when I uploaded data with the DRWI_CitSci code it showed all four variables. I tried several months ago and that didn’t work. Can anyone explain what’s going on? Perhaps the DRWI_CitSci code has some magic incantation that I missed in my earlier attempts!
Thanks
-jim
-
2020-04-08 at 4:16 PM #14044
It’s very, very intentional that ModularSensors uses that Atlas sensors only in I2C mode and I do not intend to change this. When using Atlas sensors in UART mode, each sensor must have an individually dedicated UART port. The Mayfly has exactly two hardware (processor implemented) UART’s – one dedicated to the computer/programming and the other dedicated to modem communication. It is possible to replicate UART functionality with “bit banging” libraries like AltSoftwareSerial or SoftwareSerial, but both of these have serious limitations. AltSoftwareSerial has acceptable quality communication but it is strictly limited to being used on pins 5 and 6 – which are spread on two different Grove ports on the Mayfly – and even then, monopolizes both of those pins. SoftwareSerial has poor communication quality, conflicts with every other library using interrupts including those absolutely required to wake the logger from deep sleep, and besides requires two dedicated pins. If the Atlas sensors are used as I2C devices, they can be connected to hardware already dedicated only to processor implemented I2C communication. This gives them the best quality communication, allows up to 126 devices on the same connection, and does not waste other data pins on the Mayfly. ModularSensors will continue to use I2C to support Atlas sensors.
-
2020-04-08 at 11:35 PM #14048
I don’t understand all the details but I get your point and no need to worry about baud rate! I can change the pin connections on my proto-shields to the SDA and SCL pins, no problem. However calculating temperature from the RTD on the Sensorex probe and correcting the EC reading of the Atlas EZO will be a challenge for me.
I posted more details as a new topic on the forum. My low cost EC sensor station is described in a recent blog for reference
-
-
AuthorPosts
- You must be logged in to reply to this topic.

 Welcome to EnviroDIY, a community for do-it-yourself environmental science and monitoring. EnviroDIY is part of